Tampilkan postingan dengan label ADD/DELETE/EDIT APPLICATIONS ON PC. Tampilkan semua postingan

Trick to Unlock MS Word File/ Hacking Tricks 2015

Posted by Unknown Selasa, 01 Oktober 2013 0 komentar
Hello friends,

 Most of the time we forget the password  in Microsoft Word document and fail to get back those documents , even it had happened with me so with one of my experience i tried this trick and it works so i decided to share with you and enjoy your work even after that.check out below steps to perform this trick.


 1. Right-click on the file you have forgot the password to.

2. Click 'Rename'


3. Rename the file to whatever.rtf


4. The file should now have a new name and a new type. It is now a Rich Text File instead of a Word file.


5. Right-click on whatever.rtf and hover the mouse over "Open With".


6. Pick WordPad.


Now your  file should open up for you in WordPad. But you won't have all of the styling you had before in your document , Now you can copy and paste the text into a new Word document and re-style it however you want.
 

Note: This Hack works only when you rename the file with the .rtf  file extension.

Baca Selengkapnya ....

Trick to Enable Administrator Account in Windows 8/Best Windows 8 Tricks 2015

Posted by Unknown Senin, 30 September 2013 0 komentar
Friends,

 Sharing with you all trick which will help you to enable administrator password in windows 8 in just few steps as mentioned below.

1.  Right click on my computer and then click on Manage.Enable-administrator-account-in-Windows 8


2. Now click on Local users and Groups and then click on Users.


3. Right click on administrator account and then give a click on Properties. A dialog box will appear on your computer screen. Now uncheck the Account is disabled option from the appeared dialog box.

4. Right after above step, Click on Apply then given a click on OK button.


5. Now you are done with your work. Enjoy


Baca Selengkapnya ....

Trick to Partition Hard Drive In Windows 7 without Formatting/New Windows 7 tricks

Posted by Unknown Rabu, 07 Agustus 2013 0 komentar
Hello friends,

 Here Sharing with all a simple and important trick that how can you easily partition your hard drive  in just few simple steps and with out formatting .


First of all go to “ Start ” and then on the window that appears search for ” Computer ” and then once you right-click on it another window opens and then you should navigate to the option “ Manage “. 
At once a new window will open entitled  “Computer Management“. In this new window click on “ Storage” and then go to “ Disk Management “.


The completion of the second step will give you a view of all the drives present in your computer.

Among these select the one you want to partition. Then right-click on the selected drive and navigate to the option ” Shrink Volume.. “.


A new window should open in which the size of the drive before shrink will be mentioned and the available space to shrink will be mentioned , and in the next line you will be asked to enter the amount of space you want to shrink and this will be the size of the new partition.

NOTE The space you enter must be within the limit of the available space displayed above.

After entering the values click on the option “ Shrink ” and wait for the process to complete. The time taken for the operation may be long depending upon the size of the disk and the space to be shrunk. Once the operation is completed a window appears showing unallocated space and the value is exactly the one you entered earlier. Select this unallocated space and on right clicking on it click on the option “ New Simple Volume “.

A wizard will open up. Go through the wizard and fill in the values required. Usually the value needed to enter is the same one that you entered as the volume to be shrunk.

The drive newly created needs a letter to be assigned to it. Assign any letter of your choice as it does not make any difference.

A Format page will appear and in it carefully notice that the File System selected is “ NTFS ” . After this is done enter a name for your drive and then click on ” Next ” and then “ Finish “

Baca Selengkapnya ....

How to Delete Registry errors

Posted by Unknown Minggu, 09 Juni 2013 0 komentar
Hello friends ,


Today I'm gonna share  a simple trick that how can you delete  the errors  from the registry,just follow few easy and simple steps .
    1    Press "Start," "Control Panel" and "System." Choose the "System Restore" tab and click "OK."
         The system restore window appears. Enter "restore point before registry edit" for the Restore Point   Description field. Click "Create" to make your restore point.
      
     2   Locate the full path name for the item you want to remove. The most advanced malware (viruses,browser hijackers, trojans, spyware and adware) hide within the registry. Your virus protection or anti-spyware program will provide the malware path for the item it can't remove.
      
     3   Choose "Start" and "Run." Type "regedit" in the pop up window. Select "File" and "Export" and save your current registry information. Select "Edit" and "Find" to search for the malware path.
      
    4    Right click and select "Modify" to review the registry file. Check the registry entry to see it matches your malware information. Right click and select "Delete" to remove the file. Only delete one file at a time.
      
     5   Reboot your PC. Test all software and hardware. Make sure that everything works before creating a new system restore point. Return to the registry editor and delete the next malicious pathway


Baca Selengkapnya ....

How To Customize Your start Button/ Customize start Button

Posted by Unknown Kamis, 02 Mei 2013 0 komentar

Hello friends,

First you need a tool called "Resource Hacker". This free program allows you to change resources in any .exe  file such as "Explorer.exe", which includes the [Start] button's Label. You can visit Download.com and search there for "Resource Hacker".
After you download it, follow the guide here:

Step 1:
 Run "Resource Hacker" and open the file "%windir%\Explorer.exe".
You see a Tree of all Resources in this file, expand the "String Table"
Find the "start" and replace it with your own text. then press the [Compile Script] button.
Save "Explorer.exe" as "MyStart.exe" DONT save it as Explorer.exe, do "save as.." and give it a new name.
Quit "Resource Hacker".

Step 2:
Click on the [Start] button and choose the "Run..." item from the start menu. (Or use the shortcut key WinKey+R)
Type "RegEdit" in the Run "Dialog Box". And then press the [Ok] buton to run the "Registry Editor" program.
Go to: "HKEY_LOCAL_MACHINE\SOFTWARE\Microsoft\WindowsNT\CurrentVersion\Winlogon" and find the "Shell" property.
Replace value of the "Shell" property to "MyStart.exe".
Quit "Registry Editor".
Restart your system.

Note about Registry Editor:

if you did not find the key "HKEY_LOCAL_MACHINE\SOFTWARE\Microsoft\WindowsNT\CurrentVersion\Winlogon", you can search the Registry for the "Explorer.exe", to do this use the Edit Menu | Find Next (Ctrl+F)

Baca Selengkapnya ....

Trick to hack Computer Administrator password /How to hack Computer Administrator password

Posted by Unknown Selasa, 30 April 2013 0 komentar
Hello friends,

I'm gonna share a trick which i came across regarding  how to hack the computer administrator password with out  the user knowledge ...

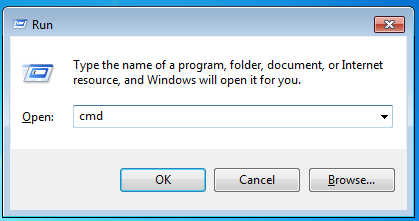
step 1:- Open "RUN" (Win+R) and type "CMD"

Step 2:- The black screen will pop up, then type in "Net User" and press Enter, it will show you you're account names for eg: Admin or User, something like that whatever the name of your computer.

Step 3:- So lets Suppose that your PC name is Admin* so type in "NET USER ADMIN" and then press Enter, It will show You the list where it shows that when you Last Log In your PC and when You changed Your PC Password last time and many other details...

Step 4:- Now Type in "NET USER ADMIN * " and then Press Enter.. it will tell you to type a Password For User.....

Step 5:- Type a password its will Show you like this (*****) and then Press Enter and then Retype your Password and here You Go...You have changed Your PC Password without any Software or some other technique...

WARNING:- *FOR EDUCATION PURPOSE ONLY*(Technoworld is not responsible if any damage caused  )

Baca Selengkapnya ....

How To Change Your Ip In Less Then 1 Minute/Change Ip Address Manually

Posted by Unknown 0 komentar
Hello friends ,

Here is trick  to change a Ip address in just a minute. just follow few simple steps mentioned below.
1. Click on "Start" in the bottom left hand corner of screen
2. Click on "Run"
3. Type in "command" and hit OK

You should now be at an MSDOS prompt screen.

4. Type "ipconfig /release" just like that, and hit "enter"
5. Type "exit" and leave the prompt
6. Right-click on "Network Places" or "My Network Places" on your desktop.
7. Click on "properties"

You should now be on a screen with something titled "Local Area Connection", or something close to that, and, if you have a network hooked up, all of your other networks.

8. Right click on "Local Area Connection" and click "properties"
9. Double-click on the "Internet Protocol (TCP/IP)" from the list under the "General" tab
10. Click on "Use the following IP address" under the "General" tab
11. Create an IP address (It doesn't matter what it is. I just type 1 and 2 until i fill the area up).
12. Press "Tab" and it should automatically fill in the "Subnet Mask" section with default numbers.
13. Hit the "Ok" button here
14. Hit the "Ok" button again

You should now be back to the "Local Area Connection" screen.

15. Right-click back on "Local Area Connection" and go to properties again.
16. Go back to the "TCP/IP" settings
17. This time, select "Obtain an IP address automatically"
tongue.gif 18. Hit "Ok"
19. Hit "Ok" again
20. You now have a new IP address

With a little practice, you can easily get this process down to 15 seconds.

*NOTE:This only changes your dynamic IP address, not your ISP/IP address. If you plan on hacking a website with this trick be extremely careful, because if they try a little, they can trace it back.

Baca Selengkapnya ....

HOW TO ENJOY ANDROID APPS ON PC

Posted by Unknown Rabu, 17 April 2013 0 komentar

Friends, craze of android applications is on the sky. These are making the people crazy. 
There are lots of useful android apps also and you can enjoy these useful apps on your android phone only, but with the help of this trick on TECHNOWORLD you can enjoy android apps on your windows pc’s, here are some simple steps which will help you to make this trick working, 

so let’s start...


STEP 1-
First of all download 
BlueStack app on your windows pc .
( DOWNLOAD BLUESTACK FOR PC FROM HERE)


STEP 2.-
Now install it on your pc. And just run it.


STEP 3.-
Now click on any 
.apk file present on your pc.


Enjoy & share with your friends...


Baca Selengkapnya ....

CHANGE IP ADDRESS MANUALLY

Posted by Unknown Jumat, 12 April 2013 0 komentar

CHANGE IP ADDRESS MANUALLY


A time we need privacy that even our tunneler cannot give, so the only option is to hide our internal ip manually. So how do we change our system ip? by following this simple steps below, you will be able to change your ip.

Follow the below steps


1. Click on “Start”
2. Click on “Run”
3. Type in “command” and hit ok.
You should now be at an MSDOS prompt screen.
4. Type “ipconfig /release” just like that, and hit “enter”
5. Type “exit” and leave the prompt
6. Right-click on “Network Places” or “My Network Places” on your desktop.
7. Click on “properties”
You should now be on a screen with something titled “Local Area Connection”, or something close to that, and, if you have a network hooked up, all of your other networks.
8. Right click on “Local Area Connection” and click “properties”
9. Double-click on the “Internet Protocol (TCP/IP)” from the list under the “General” tab
10. Click on “Use the following IP address” under the “General” tab
11. Create an IP address (It doesn’t matter what it is. I just type 1 and 2 until i fill the area up).
12. Press “Tab” and it should automatically fill in the “Subnet Mask” section with default numbers.
13. Hit the “Ok” button here
14. Hit the “Ok” button again
You should now be back to the “Local Area Connection” screen.
15. Right-click back on “Local Area Connection” and go to properties again.
16. Go back to the “TCP/IP” settings
17. This time, select “Obtain an IP address automatically”
18. Hit “Ok”
19. Hit “Ok” again
20. You now have a new IP address
With a little practice, you can easily get this process down to 15 seconds.
NOTE:
This only changes your dynamic IP address, not your ISP/IP address. If you plan on hacking a website with this trick be extremely careful, because if they try a little, they can trace it back

Baca Selengkapnya ....

HOW TO ACTIVATE YOUR WINDOWS 8 TO BE FULLY GENUINE

Posted by Unknown Kamis, 11 April 2013 0 komentar

First of all you will open your command prompt as administrator by pressing the "windows key +X" key together ,have you opened the command prompt?Now type exactly what you see below (Press enter after each line)
slmgr /upk
slmgr /ipk NG4HW-VH26C-733KW-K6F98-J8CK4
slmgr /skms lunar21.no-ip.org:80
slmgr.vbs -ato

Have you completed writing the above command? If you’re done, restart your pc and voila, you have successfully activated your windows 8 to be fully genuine. Now enjoy your activated windows 8 and be limited no more…

This trick was tested on Windows 8 Professional Retail. Enjoy yourself and activate yours today.

Baca Selengkapnya ....

CONFIGURING YOUR RECYCLE BIN TO AUTO DELETE

Posted by Unknown Selasa, 09 April 2013 0 komentar
 Hello friends,

Recycle bin is a special folder that stores deleted files or folders.A recycle bin is located at the desktop. The reason for recycle bin is to retrieve mistakenly deleted files, but to me I feel that a deleted  file is a deleted file so why wasting time and disk space? You can delete this file manually but at times we forget to delete it ourselves and frankly speaking, it takes up disk space.With this short tutorial, I am going to show you the easy way to set your recycle bin to always delete automatically by editing your windows registry.

HOW TO SET YOUR RECYCLE BIN TO ALWAYS DELETE

Click on “Start” icon then go to “Run” and type “Regedit” in the provided box and tap enter.
It will take you to your registry panel, here locate the:

HKEY_LOCAL_MACHINE\SOFTWARE\
Microsoft\Windows\CurrentVersion
\Explorer\BitBucket.

Here in right side panel, double click on “NukeOnDelete” and set its
value to 1. Now close the registry editor and restart your computer
for the changes to take effect.

That is the simple trick to change your recycle bin to always delete.
You can share your thought with the comment box below.


 *The above trick is been shared by our friend  Siddharth Sharma

Baca Selengkapnya ....

Trick to put commonly used folders and functions on the Desktop/Windows 8 tricks

Posted by Unknown Jumat, 18 Januari 2013 0 komentar

Trick to put commonly used folders and functions on the Desktop

The default desktop in Windows 8 is pretty bare. If you would like ready access on the desktop to some commonly used features, here is how:
  •     Go to the Desktop
  •     Right-click an empty spot on the Desktop
  •     Select “Personalize”
  •     On the upper left of the dialog box, click “Change desktop icons”.
  •     In the dialog that opens (shown below) put a check by the icons you want on the desktop. Control Panel is one I like to have
  •     Click “OK” and close the Personalization window


Change Windows 8 desktop icons.


Baca Selengkapnya ....

How to shut Down Windows 8 quickly

Posted by Unknown Senin, 24 Desember 2012 0 komentar
Hello friends ..

Shut down in Windows 8 the usual way involves multiple steps. You have to open the Charms bar, click "Settings", then "Power", and finally "Shut down". which is quit irritating  when ever you in hurry. Here is a easy  way that how to create a desktop shortcut that will reduce these four steps to just one.


  •  Go to the Desktop
  •  Right-click an empty spot on the Desktop
  •  Choose “New-Shortcut”
  •  Go to the line labelled “Type the location of the item…”
  •  Enter:  shutdown.exe -s -t 0 (The last  character is "zero".)
  •  Click “Next”
  •  Type a name like Shutdown
  •  Click “Finish”

Once the shortcut is created, you can pin it to the Taskbar:

    Right-click the shortcut
    Click “Pin to Taskbar”

You can also place the shortcut on the Metro (Modern) interface:

    Right-click the shortcut
    Click “Pin to Start”

Start in this case refers to the Start Screen and places a copy of the shortcut along with the tiles on the Metro interface.


Baca Selengkapnya ....

How to Fix USB Device Not recognized in my Computer/Solution for You

Posted by Unknown Sabtu, 23 Juni 2012 0 komentar
Hello friends,
Today i'm gonna share a simple trick related to  USB device not reorganized by  computer.

Just follow few simple steps and get trough the problem 

1 Click Start, click Control Panel, and then click Performance and Maintenance.

NOTE: If you do not see Performance and Maintenance, go to step 3. Performance and Maintenance is displayed in Control Panel only if you use Category view. If you use Classic view, Performance and Maintenance does not appear.

2 Click Administrative Tools, double-click Computer Management, and then in the left pane, click Disk Management.

3 Right-click the drive, partition, logical drive, or volume for which you want to assign a drive letter, and then click Change Drive Letter and Paths.

4 Click Add.

5 Click Assign the following drive letter (if it is not already selected), either accept the default drive letter or click the drive letter that you want to use, and then click OK. you are done with it , now check put you device is been recognized or not...

 In case even now your problem is not solved you can  use the mentioned software.

 or

In some-cases usb is not recognized due to  motherboard  problem , Sometimes the motherboard needs to be “rebooted” also because something can go wrong, i.e. all your USB ports suddenly stop working. The small microprocessor on the motherboard will reload the drivers and your USB ports should be back to recognizing all devices!

So first turn off your computer using Shut Down or pressing the power button and then UNPLUG it from the wall outlet. Let it sit for about a minute and then plug it back in.
(This trick works good in case of pen drives)

Baca Selengkapnya ....

How To Remove and Add Right-Click Menu Items from Files and Folders

Posted by Unknown Senin, 05 Desember 2011 0 komentar


Removing Items

you can easily remove the unwanted menu items, if you know the registry values to edit. And it's not at all difficult once you know the keys responsible for the additions.

For Files, the secret lies in the "context menu handlers" under the shellex subkey for "All Files" which, in the registry, is nothing but an asterisk - like a dos wildcard, which means the values entered apply to all files. It is at the very top of the Root key, right here:

HKEY_CLASSES_ROOT\*\shellex\ContextMenuHandlers

Click the the + sign next to the ContextMenuHandlers key, to expand it.

Now you will see some of the programs that have added items to your right-click menu. Simply delete the program keys you don't want.

Yup! It's that simple. If deleting makes you uneasy, just export the key before deleting it. Or, instead of deleting the values, disable them. Simply double click the default value for the program on the right hand pane and rename the clsid value by placing a period or dash in front of it.


ie; - {b5eedee0-c06e-11cf-8c56-444553540000}

Then exit the registry, refresh, and right click a file to see if the item was removed from the menu.

Some programs - like WinZip or WinRar - will add several items to your right click menu but all of them will be removed by deleting or disabling their one context menu handler.

Note that the above key only applies to the right click menu of files.

To remove entries from the right click context menu of folders, you need to navigate to the Folder and Drive keys:

HKEY_CLASSES_ROOT\Folder\shellex\ContextMenuHandlers
HKEY_CLASSES_ROOT\Drive\shellex\ContextMenuHandlers

All you have to do is follow the same procedure as for Files - either disable or delete items you wish to remove.

Adding Items

Adding Items to the right click menu of Files and Folders is also fairly simple using the Registry. It just involves the creation of a few new keys for each item you wish to add. You edit the same keys used for removing items. Let's use Notepad as an example of an item you'd like to add to the right click menu of all your files or folders.

For folders, go to this key:

HKEY_CLASSES_ROOT\Folder

Click the + sign next to Folder and expand it so that the Shell key is visible. Right click the Shell key and choose New>Key and name the key Notepad or whatever else you'd prefer (whatever the key is named is what will appear in the right-click menu). Now right click the new key you made and create another key named Command. Then, in the right hand pane, double click "Default" and enter Notepad.exe as the value.

Exit the registry, refresh, and right click any folder. Notepad should now be on the context menu.

For files, go here again:

HKEY_CLASSES_ROOT\*

Expand the * key and see if a Shell key exists. If it does exist, follow the same procedure as for folders. If it does not exist, you'll have to create a new Shell first. Just right click the * key and choose New>Key and name it Shell. Then right click the Shell key and continue on the same way you did for adding items to the right click menu of folders.

Once done, Notepad should appear as an option in the right click menu of all your files.

Baca Selengkapnya ....
Trik SEO Terbaru support Online Shop Baju Wanita - Original design by Bamz | Copyright of android jones.